How to map a process in 30 minutes (template inside)
You have a workflow you keep meaning to document. You have a process tool open in a tab. Somehow ninety minutes later you have a half-finished diagram, no roles assigned anywhere, and a vague plan to "come back to it tomorrow." This is a 30-minute method that ends with something useful even if you stop early — five six-minute steps, in order, plus a live workspace you can clone as your starting template.
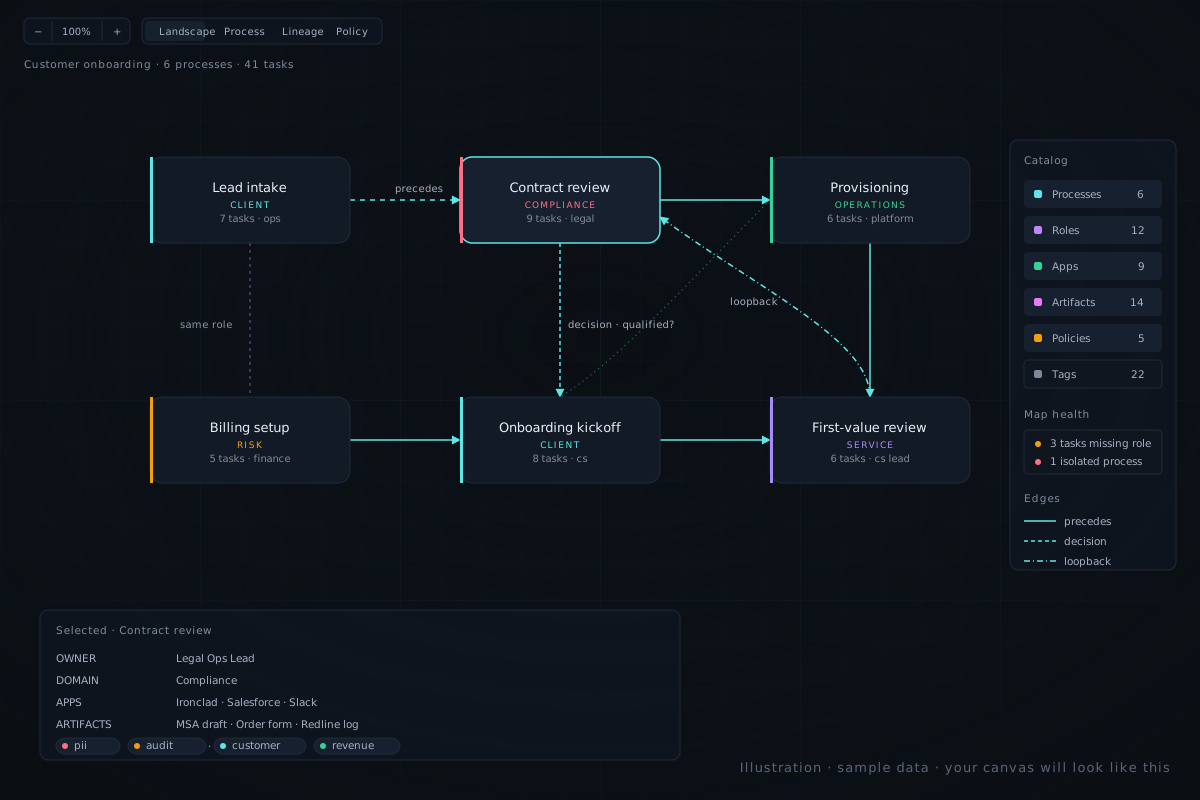
Most attempts stall because the work gets treated as one task — "document the workflow" — when it is really five, each with a different shape: brain dump, group, model, assign, govern. Mix them up and you spend forty minutes on a diagram missing the only piece anyone ever asks about: who owns each step. Done in order, time-boxed, the first pass takes thirty minutes. The goal is not "perfect" but "good enough that the gaps are visible" — and Process Map's side panel and the Map Health view at /app/health do the noticing for you.
What you need before you start
Three things. None of them are optional, all of them take less than a minute to set up.
- A real example process. Vendor onboarding is the easiest one to model cold because it touches roles (procurement, legal, security, finance), applications (CRM, contract tool, security questionnaire tracker), artifacts (SOW, DPA, security review), and a policy (vendor risk standard). If that does not fit your company, pick another with the same shape: customer onboarding, employee onboarding, incident response, monthly close. Avoid purely engineering-internal workflows on the first attempt — those are all tools and no roles, which hides the layered model.
- Pen and paper, or any unstructured notes app. The first six minutes happen here, not in any process tool. Deliberate; we explain why below.
- Thirty uninterrupted minutes. Block the calendar, close Slack. The exercise does not work in five-minute chunks between meetings — the cost of re-loading the workflow into your head every time eats the budget.
The 30-minute method
Five steps, six minutes each. Set a timer. When it goes off, move on whether or not the previous step feels finished. The point of the time-box is to force you past the perfectionism that kills the first pass.
1. Brain-dump the steps 6 min · paper
On paper. Not in a process tool. Just the verbs, roughly in the order they happen. "Receive vendor request → check internal vendor list → email security team → send DPA → wait for legal review → invoice approval → set up in finance..." Don't number them, don't be exhaustive, don't worry about decision points. Surface what your brain already knows about the workflow; do not build a taxonomy.
Why paper: any structured tool — including ours — tempts you to start formatting, indenting, picking shapes, aligning. That is the wrong work for minute one. Paper gives you nowhere to procrastinate.
2. Group into a flow 6 min · paper
Still on paper. Look at your dump and answer two questions. Which steps are sequential and which are parallel — i.e. could happen at the same time without breaking anything? And where are the decision points — places where the process branches based on a yes/no, or where a step kicks back to an earlier one?
Draw arrows between the verbs. Mark decisions with a label ("approved?", "high-risk vendor?"). Mark loop-backs explicitly. You should end this step with three or four loose clusters — a rough shape, not a finished diagram.
3. Pour into Process Map 6 min · canvas
Now open the canvas. Use the layered view in the order it was designed for: process landscape first, task detail second. Each cluster from step two becomes a single process node on the landscape — "Vendor Intake," "Security Review," "Contract & DPA," "Finance Setup." Don't drop in tasks yet; the landscape is for "what processes does this workflow touch and in what order," not for "what are all the steps."
Once the process nodes are connected, click into one and add the actual steps as tasks. Resist refactoring the landscape while you are in task-detail — staying in one view at a time is half the speed gain.
4. Assign roles 6 min · canvas
For every task, fill in the owning role. Not the person — the role. "Procurement Analyst," not "Maya." Roles outlast the people who hold them; that is the whole point. If a role does not exist yet, add it as a custom role rather than reusing one that almost fits. You will know within a week whether the new role is real or whether it was a one-off; the worst case is you delete it.
Two cheats. If you don't know who owns a step, mark it "TBD-Owner" rather than skipping the field — Map Health flags missing roles, and a flagged gap is more useful than silence. And if the same role owns four consecutive tasks, batch-assign from the side panel rather than clicking each.
5. Attach artifacts and the policy 6 min · canvas
For each task, what document or record does it produce or consume? For vendor onboarding: the request form (consumed), the DPA (produced and consumed downstream), the security review record (produced), the signed SOW (produced), the vendor record in your CRM (produced). Each of these is a first-class artifact in Process Map — you create one and link it to the tasks that touch it, rather than typing the same artifact name into three task descriptions.
Then attach the governing policy to the process — for vendor onboarding, your Vendor Risk Standard or whatever your equivalent is called. The policy is also a first-class entity; once attached, you can answer the reverse question — "which processes does this policy govern?" — from the policy's own page. That is the payoff for spending a minute on it now.
What "finished" looks like
Not a perfect diagram. Three signals tell you the first pass is good enough to ship and iterate.
- Every task has an owning role. Including the ones you marked "TBD-Owner" — that is still a row, and a real one. Zero empty role fields.
- The Map Health side panel shows zero red flags. Yellow warnings (missing artifact links, no policy attached, coverage below 50%) are fine for a first pass; red flags (orphaned tasks, broken edges, processes with no owner) need a fix before you walk away.
- You can hand the canvas to a new hire and they can ask sensible follow-up questions. Not "what does this mean?" questions — those mean the labels are too cryptic — but "what happens if the security review fails?" questions. If a colleague can interrogate your map and you can answer from the map without consulting your memory, the map is doing its job.
Note that "the diagram is pretty" is not on this list. Pretty is table stakes — Process Map clips edges, picks node shapes, and enforces consistent spacing for you. Spending the first pass tweaking layout is exactly the trap step three was designed to prevent.
Try the layered canvas free — sample workspace and template included.
Start mapping in 30 minutesIf you only have 10 minutes
Half the time, you will not get thirty minutes on the calendar. Run a scaled-down version: just steps one, two, and three. Brain-dump, group, pour into the canvas. Stop. Leave the role assignments and the artifact links for tomorrow. The unfinished map is still a useful one because the side panel will tell you exactly what is missing — your future self walks back into the workspace and the next twenty minutes of work are pre-itemised.
This is the biggest workflow advantage of structured mapping over a freeform diagram tool. In Lucid or Miro, a half-finished diagram is just a half-finished diagram. In Process Map, a half-finished map has a punch list attached — every missing role, unattached artifact, and isolated node is on the Map Health view by name. Pick it up, fix three things, save. Repeat next week.
About the template
You don't need to download anything. Sign up for a free workspace and click "Load sample data" — what loads is a real, multi-process organisation modelled on a financial-services ops team, with fourteen processes (including a Vendor Onboarding node), a fully fleshed out KYC task tree as a worked example of the layered model, populated role and policy layers, and a handful of validation hints already pointing at gaps left for you to fix.
Treat the sample workspace as your fork-and-edit template. KYC is the most detailed process and is the best place to study how tasks, roles, artifacts, and policies stack up. Fork the sample, delete what is not relevant, rename the rest. That is faster than starting from a blank canvas, and the structure teaches the layered model better than reading another guide about it. We do not ship downloadable PDFs because the cross-process queries — "which processes does the KYC Analyst own?", "which workflows does the AML policy govern?" — don't survive a flat export. The sample workspace is the template.
Where to go from here
Two next steps once your first map is up. First, send the canvas link to one of the people whose work you mapped and ask them to argue with it. Their corrections are the highest-quality data you will get on the workflow, because they are reacting to a concrete picture rather than filling in a survey. Per-process visibility settings let you scope the share without making the whole workspace public.
Second, leave it alone for a week and come back. The hints you missed will be obvious. Fix what is mysterious, ignore the rest, repeat monthly. That is the entire long-term maintenance practice — a thirty-minute first pass, a fifteen-minute review cycle, and the Map Health view doing the noticing for you.